As a seasoned supplier of fiber optic pigtails, I've witnessed firsthand the importance of a well - executed repair process. Fiber optic pigtails are crucial components in optical communication systems, and when they encounter issues, a proper repair can save both time and money. In this blog, I'll delve into the step - by - step repair process of fiber optic pigtails.
Initial Inspection
The first step in the repair process is a thorough inspection of the damaged fiber optic pigtail. This inspection is vital as it helps to identify the root cause of the problem. We start by visually examining the pigtail for any obvious signs of damage such as cuts, bends, or breaks in the fiber cable. Special attention is paid to the connector end, which is often the most vulnerable part.
We use a fiber optic microscope to get a detailed view of the connector end - face. This high - resolution tool allows us to detect microscopic scratches, dirt, or other contaminants that could be affecting the optical performance. Any signs of damage or contamination can lead to increased signal loss or even complete signal interruption.
If the pigtail is part of a larger system, we also check the surrounding environment. Factors like excessive heat, humidity, or physical stress can contribute to the damage of the pigtail. For example, if the pigtail is installed in an area with poor ventilation, overheating could cause the fiber coating to degrade over time.
Cleaning
Once the inspection is complete and we've identified contaminants as the issue, the next step is cleaning. Cleaning is a delicate process that requires the use of specialized tools and cleaning solutions.
We typically use lint - free wipes and isopropyl alcohol to clean the connector end - face. First, we moisten the wipe with a small amount of alcohol. Then, we gently wipe the end - face in a single, smooth motion. It's important not to apply too much pressure as this could damage the fragile fiber.
For more stubborn contaminants, we might use a fiber optic cleaning pen. These pens are designed to remove dirt and debris from the connector end - face without scratching it. They work by using a rotating brush or a dry - cleaning tip to lift away the contaminants.
After cleaning, we re - inspect the connector using the fiber optic microscope to ensure that all contaminants have been removed. If the problem persists after cleaning, it's likely that there is more severe damage to the fiber.
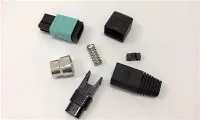
Connector Replacement
If the inspection reveals that the connector is damaged beyond repair, the next step is to replace it. Connector replacement is a more complex process that requires a certain level of skill and precision.
We start by carefully removing the damaged connector from the pigtail. This is done using a fiber stripper, which is a tool designed to remove the outer coating of the fiber cable without damaging the inner fiber. Once the coating is removed, we expose a short length of the bare fiber.
Next, we prepare the new connector. This involves inserting the bare fiber into the connector body and securing it in place. We use an adhesive or a mechanical locking mechanism, depending on the type of connector. For example, some connectors use epoxy resin to bond the fiber to the connector body, while others use a push - on or screw - on locking mechanism.
After the fiber is inserted into the connector, we need to polish the end - face. Polishing is crucial as it ensures that the end - face is flat and smooth, which is essential for proper optical transmission. We use a polishing machine and a series of polishing films with different grits to achieve the desired finish.
Splicing
In some cases, the damage may be located further down the fiber cable rather than at the connector. In such situations, splicing is the solution. Splicing involves joining two pieces of fiber together to restore the continuity of the signal.
There are two main types of splicing: fusion splicing and mechanical splicing. Fusion splicing is the preferred method for most applications as it provides a low - loss and permanent connection.
In fusion splicing, we use a fusion splicer, which is a high - precision machine that uses an electric arc to melt the ends of the two fibers together. First, we strip the outer coating of the two fibers and clean them to remove any contaminants. Then, we align the two fibers precisely using the fusion splicer's alignment system. Once the fibers are aligned, the splicer creates an electric arc that melts the ends of the fibers, fusing them together.
Mechanical splicing, on the other hand, uses a mechanical splice connector to hold the two fibers together. This method is quicker and less expensive than fusion splicing but may result in slightly higher signal loss.


Testing
After the repair process is complete, whether it's cleaning, connector replacement, or splicing, we need to test the repaired pigtail to ensure that it is functioning properly.
We use an optical time - domain reflectometer (OTDR) to test the pigtail. The OTDR sends a short pulse of light into the fiber and measures the amount of light that is reflected back. By analyzing the reflected light, we can determine the length of the fiber, the location of any splices or connectors, and the amount of signal loss along the fiber.
We also use a light source and a power meter to measure the optical power at the input and output of the pigtail. This allows us to calculate the insertion loss, which is a measure of how much signal is lost as it passes through the pigtail. A low insertion loss indicates that the pigtail is performing well.
If the test results are within the acceptable range, the pigtail is ready to be reinstalled in the system. If not, we need to go back and re - evaluate the repair process to identify and correct any issues.
Quality Assurance
Before we supply the repaired fiber optic pigtail to our customers, we conduct a final quality assurance check. This check ensures that the pigtail meets our high - quality standards.
We review the test results and compare them to our quality control specifications. We also inspect the pigtail one last time to ensure that there are no visible signs of damage or improper repair.
If the pigtail passes the quality assurance check, we package it carefully to prevent any damage during shipping. We use protective packaging materials such as foam inserts and anti - static bags to ensure that the pigtail arrives at our customer's location in perfect condition.
Conclusion
The repair process of fiber optic pigtails is a complex but essential procedure. By following a systematic approach that includes inspection, cleaning, connector replacement, splicing, and testing, we can ensure that damaged pigtails are restored to their optimal performance.
At our company, we have a team of experienced technicians who are well - versed in the repair process of fiber optic pigtails. We also offer a wide range of high - quality fiber optic pigtails, including Fiber Optic E2000 Pigtail, Fiber Optic St Pigtails, and Fiber Optic Fc Pigtail.
If you are facing issues with your fiber optic pigtails or are interested in purchasing high - quality pigtails, please feel free to contact us for a detailed discussion. Our team is always ready to assist you with your fiber optic needs.
References
- "Fiber Optic Communication Technology" by Gerd Keiser
- "Optical Fiber Splicing and Connectorization Handbook" by Craig M. Lapsley