Hey there, fellow fiber optic enthusiasts! As a supplier of fiber optic connectors, I've seen my fair share of damaged connectors. And let me tell you, replacing them isn't as scary as it might seem. In this blog post, I'm going to walk you through the process of replacing a damaged fiber optic connector step by step.
Why Replace a Damaged Connector?
First off, you might be wondering why you even need to replace a damaged fiber optic connector. Well, a damaged connector can cause a whole bunch of problems. It can lead to signal loss, which means your data transmission won't be as reliable. You might experience slow internet speeds, dropped calls, or even complete network outages. So, replacing a damaged connector is crucial to keep your fiber optic network running smoothly.
Tools and Materials You'll Need
Before you start replacing the connector, you'll need to gather a few tools and materials. Here's what you'll need:


- Fiber optic strippers: These are used to remove the outer coating of the fiber optic cable.
- Fiber optic cleaver: This tool is used to make a clean, precise cut on the fiber optic cable.
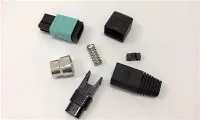
- New fiber optic connector: Make sure you choose the right type of connector for your cable. You can check out our Fiber Optic Mpo Connector, Fiber Optic Fast Connector Sc Apc, or Fiber Optic Fast Connector Sc options.
- Epoxy or adhesive: This is used to secure the connector to the cable.
- Curing oven or heat gun (if required): Some connectors require heat to cure the epoxy.
- Cleaning supplies: You'll need isopropyl alcohol and lint-free wipes to clean the fiber and the connector.
- Inspection microscope: This is used to check the quality of the fiber end face after cleaning and splicing.
Step 1: Prepare the Work Area
It's important to work in a clean and well-lit area. Dust and debris can easily contaminate the fiber optic cable and the connector, so make sure your workspace is free of any dirt. Lay out all your tools and materials so you can easily access them during the process.
Step 2: Remove the Damaged Connector
The first thing you need to do is remove the damaged connector from the fiber optic cable. Use the fiber optic strippers to carefully remove the outer coating of the cable near the connector. Be careful not to damage the inner fiber. Once the outer coating is removed, you can use a pair of pliers to gently pull the damaged connector off the cable.
Step 3: Clean the Fiber
After removing the damaged connector, you need to clean the exposed fiber. Dip a lint-free wipe in isopropyl alcohol and gently wipe the fiber to remove any dirt, oil, or epoxy residue. Make sure you clean the entire length of the exposed fiber.
Step 4: Strip the Fiber
Use the fiber optic strippers to remove a small section of the buffer coating from the end of the fiber. The length of the stripped section will depend on the type of connector you're using. Refer to the manufacturer's instructions for the correct stripping length.
Step 5: Cleave the Fiber
Once the fiber is stripped, it's time to cleave it. A cleave is a clean, precise cut on the fiber that ensures good light transmission. Use the fiber optic cleaver to make the cleave. Place the fiber in the cleaver according to the manufacturer's instructions and apply gentle pressure to make the cut.
Step 6: Prepare the New Connector
Before you attach the new connector to the fiber, you need to prepare it. If the connector uses epoxy, mix the epoxy according to the manufacturer's instructions. Apply a small amount of epoxy to the inside of the connector.
Step 7: Insert the Fiber into the Connector
Carefully insert the cleaved end of the fiber into the connector. Make sure the fiber is centered and goes all the way to the end of the connector. If the connector requires heat to cure the epoxy, place it in the curing oven or use a heat gun to apply heat according to the manufacturer's instructions.
Step 8: Clean and Inspect the Connector
After the epoxy has cured, clean the end face of the connector using isopropyl alcohol and a lint-free wipe. Then, use an inspection microscope to check the quality of the fiber end face. Look for any cracks, chips, or contaminants. If you notice any issues, you may need to repeat the process.
Step 9: Test the Connection
Once you're satisfied with the quality of the connector, it's time to test the connection. Use a fiber optic tester to check the signal loss and other parameters. If the test results are within the acceptable range, then your new connector is working properly.
Troubleshooting Tips
- Signal loss is too high: This could be due to a poor cleave, contaminated fiber, or improper epoxy application. Check the fiber end face again and make sure it's clean and properly cleaved.
- Connector won't fit properly: Make sure you're using the right type of connector for your cable. Check the dimensions and specifications of the connector and the cable.
- Epoxy doesn't cure properly: This could be due to incorrect mixing, insufficient heat, or expired epoxy. Make sure you follow the manufacturer's instructions carefully.
Conclusion
Replacing a damaged fiber optic connector might seem like a daunting task, but with the right tools and a little patience, you can do it yourself. By following the steps outlined in this blog post, you can ensure that your fiber optic network stays up and running smoothly.
If you're in the market for high-quality fiber optic connectors, look no further. We're a leading supplier of fiber optic connectors, and we offer a wide range of products to meet your needs. Whether you need a Fiber Optic Mpo Connector, Fiber Optic Fast Connector Sc Apc, or Fiber Optic Fast Connector Sc, we've got you covered.
If you have any questions or would like to discuss your specific requirements, feel free to reach out to us. We're here to help you find the best solutions for your fiber optic needs.
References
- "Fiber Optic Installation and Maintenance Handbook"
- Manufacturer's instructions for fiber optic tools and connectors