As a supplier of Fiber Optic SC Connectors, I've witnessed firsthand the growing demand for high - speed and reliable internet connections. Fiber optic technology has become the backbone of modern communication systems, and routers play a crucial role in distributing this high - speed data. Installing a Fiber Optic SC Connector on a fiber optic router might seem daunting at first, but with the right knowledge and tools, it can be a straightforward process.
Understanding the Basics of Fiber Optic SC Connectors
Before we dive into the installation process, it's essential to understand what a Fiber Optic SC Connector is. SC stands for Subscriber Connector, and it's a popular type of fiber optic connector known for its push - pull latching mechanism, which provides a quick and secure connection. These connectors are widely used in data centers, telecommunications networks, and even home broadband setups.
The SC connector has a square - shaped body and a 2.5mm ferrule that holds the fiber optic strand. It comes in two main types: UPC (Ultra Physical Contact) and APC (Angled Physical Contact). UPC connectors are used in most general - purpose applications, while APC connectors are preferred in applications where minimizing back - reflection is critical, such as in some long - haul and CATV networks.
Tools and Materials Needed
To install a Fiber Optic SC Connector on a fiber optic router, you'll need the following:
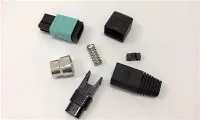
- Fiber Optic SC Connector: You can find a high - quality Conector Ftth Fiber Optic Sc Fast Connector on our website. These connectors are designed for easy installation and reliable performance.
- Fiber Optic Cable: Ensure that the cable is compatible with the router and the SC connector.
- Fiber Strippers: These tools are used to remove the outer jacket and buffer coating of the fiber optic cable.
- Fiber Cleaver: A cleaver is used to make a clean, precise cut at the end of the fiber, which is crucial for a good connection.
- Connector Installation Kit: This may include epoxy, curing ovens (for epoxy - based connectors), or mechanical splicing components.
- Cleaning Supplies: Isopropyl alcohol and lint - free wipes are used to clean the fiber end - face and the connector.
- Multimeter or Optical Time - Domain Reflectometer (OTDR): These tools can be used to test the connection and measure the optical loss.
Step - by - Step Installation Process
Step 1: Prepare the Fiber Optic Cable
- Measure and Cut: Measure the required length of the fiber optic cable and use a sharp cutter to make a clean cut.
- Strip the Cable: Use the fiber strippers to remove the outer jacket and buffer coating of the cable, exposing the bare fiber. Be careful not to damage the fiber during this process.
- Clean the Fiber: Wipe the exposed fiber with a lint - free wipe soaked in isopropyl alcohol to remove any dirt or debris.
Step 2: Prepare the SC Connector
- Inspect the Connector: Check the connector for any damage or defects. Make sure the ferrule is clean and free of scratches.
- Assemble the Connector (if required): Some connectors come pre - assembled, while others may require you to insert the fiber into the connector body and attach any necessary components.
Step 3: Splice or Terminate the Fiber
There are two main methods for connecting the fiber to the SC connector: epoxy - based splicing and mechanical splicing.
Epoxy - Based Splicing
- Mix the Epoxy: Follow the manufacturer's instructions to mix the epoxy thoroughly.
- Fill the Connector: Use a syringe or other applicator to fill the connector ferrule with the epoxy.
- Insert the Fiber: Carefully insert the cleaned fiber into the connector until it reaches the end of the ferrule. Make sure there are no air bubbles in the epoxy.
- Cure the Epoxy: Place the connector in a curing oven or follow the recommended curing time at room temperature.
Mechanical Splicing


- Align the Fiber: Use the mechanical splicing components to align the fiber with the connector ferrule.
- Secure the Connection: Tighten the mechanical splicing components to hold the fiber in place.
Step 4: Polish the Connector
After the epoxy has cured or the mechanical splicing is complete, the connector end - face needs to be polished to ensure a smooth and flat surface. This is typically done using a polishing machine and a series of polishing films with different grits.
- Initial Polishing: Start with a coarse - grit polishing film to remove any excess epoxy or rough edges.
- Intermediate Polishing: Use a medium - grit polishing film to further smooth the surface.
- Final Polishing: Finish with a fine - grit polishing film to achieve a mirror - like finish.
Step 5: Clean and Inspect the Connector
- Clean the Connector: Wipe the polished connector end - face with a lint - free wipe soaked in isopropyl alcohol to remove any polishing debris.
- Inspect the Connector: Use a fiber optic microscope to inspect the connector end - face for any scratches, dirt, or other defects. If any issues are found, repeat the polishing process.
Step 6: Connect the SC Connector to the Router
- Locate the Fiber Optic Port: Find the fiber optic port on the router. It is usually labeled clearly.
- Insert the Connector: Gently insert the SC connector into the router port until you hear a click, indicating a secure connection.
Testing the Connection
After installing the Fiber Optic SC Connector on the router, it's important to test the connection to ensure that it is working properly.
- Visual Inspection: Check for any visible signs of damage or loose connections.
- Optical Loss Measurement: Use a multimeter or OTDR to measure the optical loss of the connection. The loss should be within the acceptable range specified by the manufacturer.
- Data Transfer Test: Try transferring data through the router to verify that the connection is stable and the data is being transmitted correctly.
Troubleshooting
If you encounter any problems during the installation or testing process, here are some common issues and solutions:
- High Optical Loss: This could be due to a dirty connector, a poor splice, or a damaged fiber. Clean the connector, re - splice the fiber if necessary, or replace the damaged component.
- No Data Transfer: Check the router settings, ensure that the fiber optic cable is properly connected, and test the cable with a different device if possible.
- Connector Not Fitting Properly: Make sure that the connector is the correct type for the router port and that there are no physical obstructions in the port.
Other Fiber Optic Connectors in Our Catalog
In addition to the Fiber Optic SC Connector, we also offer a wide range of other fiber optic connectors, such as Fiber Optic Pigtail Lc Upc Om3 12 Colors and Fiber Optic Mpo Connector. These connectors are suitable for various applications and can be used in combination with the SC connectors to build a comprehensive fiber optic network.
Contact Us for Procurement
If you're interested in purchasing Fiber Optic SC Connectors or any other fiber optic products, we're here to help. Our team of experts can provide you with detailed product information, technical support, and competitive pricing. Whether you're a small business looking to upgrade your network or a large enterprise in need of a high - volume supply, we have the solutions to meet your needs. Reach out to us today to start the procurement process and take your fiber optic network to the next level.
References
- "Fiber Optic Network Design and Installation Handbook"
- Manufacturer's manuals for fiber optic connectors and tools
- Industry standards and guidelines for fiber optic installation and testing