Terminating fiber optic ST pigtails is a crucial process that requires precision and knowledge. As a supplier of fiber optic ST pigtails, I've encountered numerous inquiries regarding the termination process. In this blog post, I'll share a detailed guide on how to terminate fiber optic ST pigtails, ensuring optimal performance and reliability.
Understanding Fiber Optic ST Pigtails
Before delving into the termination process, it's essential to understand what fiber optic ST pigtails are. ST pigtails are short lengths of fiber optic cable with a pre - installed ST connector on one end. They are commonly used in fiber optic networks for splicing to other fibers or connecting to equipment. The ST connector is a bayonet - style connector, known for its ease of use and reliability.
Tools and Materials Required
To terminate fiber optic ST pigtails successfully, you'll need the following tools and materials:


- Fiber Optic Cable Strippers: These are used to remove the outer jacket, buffer coating, and sometimes the acrylate coating from the fiber.
- Fiber Cleaver: A high - quality fiber cleaver is essential for making a clean, perpendicular cut on the fiber end.
- Epoxy and Epoxy Injector: Epoxy is used to bond the fiber to the connector. The injector helps in precisely applying the epoxy.
- Curing Oven or Heat Gun: To cure the epoxy, you'll need either a curing oven or a heat gun.
- Polishing Film and Polishing Block: These are used to polish the fiber end after the epoxy has cured, ensuring a smooth and flat surface for optimal light transmission.
- Cleaning Supplies: Isopropyl alcohol and lint - free wipes are necessary for cleaning the fiber and connector components.
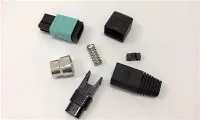
- ST Connector: The connector that will be attached to the pigtail.
- Fiber Optic ST Pigtail: The cable that you'll be terminating.
Step - by - Step Termination Process
Step 1: Prepare the Fiber
- Strip the Cable: Use the fiber optic cable strippers to remove the outer jacket of the pigtail, typically about 30 - 40 mm. Then, strip the buffer coating, leaving about 10 - 15 mm of bare fiber.
- Clean the Fiber: Dip a lint - free wipe in isopropyl alcohol and gently clean the bare fiber to remove any dirt or debris.
Step 2: Prepare the Connector
- Inspect the Connector: Check the ST connector for any visible damage or defects. Make sure the ferrule is clean and free of scratches.
- Mix the Epoxy: If using a two - part epoxy, mix it thoroughly according to the manufacturer's instructions.
- Inject the Epoxy: Use the epoxy injector to fill the connector ferrule with epoxy. Be careful not to over - fill.
Step 3: Insert the Fiber into the Connector
- Align the Fiber: Carefully insert the cleaned bare fiber into the connector ferrule, ensuring it goes all the way to the end. Make sure the fiber is centered within the ferrule.
- Remove Excess Epoxy: Wipe away any excess epoxy that squeezes out of the ferrule using a lint - free wipe.
Step 4: Cure the Epoxy
- Use a Curing Oven: Place the connector in the curing oven at the recommended temperature and for the specified time. This usually takes around 10 - 15 minutes.
- Alternative: Heat Gun: If you don't have a curing oven, you can use a heat gun. Hold the heat gun about 2 - 3 inches away from the connector and move it around evenly to cure the epoxy. Be careful not to overheat the connector.
Step 5: Polish the Fiber
- Initial Polishing: Place the connector on the polishing block with a coarse polishing film. Make circular or figure - eight motions to polish the fiber end. This helps to remove any epoxy residue and shape the fiber.
- Fine Polishing: Replace the coarse polishing film with a fine - grit polishing film and repeat the polishing process. This step helps to achieve a smooth and flat surface on the fiber end.
- Final Cleaning: After polishing, clean the connector ferrule again with isopropyl alcohol and a lint - free wipe to remove any polishing debris.
Testing the Terminated Pigtail
Once the termination process is complete, it's crucial to test the pigtail to ensure proper performance. You can use an optical time - domain reflectometer (OTDR) or a light source and power meter to measure the insertion loss and return loss of the terminated pigtail. Acceptable insertion loss for a well - terminated ST pigtail is typically less than 0.3 dB, and return loss should be greater than 50 dB.
Troubleshooting
If you encounter issues during the termination process or the testing phase, here are some common problems and solutions:
- High Insertion Loss: This could be due to a dirty or damaged ferrule, improper fiber alignment, or poor polishing. Clean the ferrule, realign the fiber, or re - polish the end if necessary.
- Low Return Loss: A low return loss may indicate a rough or uneven fiber surface. Re - polish the fiber using finer - grit polishing films.
- Epoxy Bubbles: If you notice bubbles in the epoxy, you may have mixed the epoxy incorrectly or injected it too quickly. Remove the fiber, clean the connector, and repeat the epoxy injection process.
Related Products
In addition to fiber optic ST pigtails, we also offer a wide range of other fiber optic products. For example, our LC Simplex Fiber Patch Cord is a popular choice for high - speed data transmission. It features a single - mode or multi - mode fiber and is available in various lengths. Another product is the Fiber Optic E2000 Pigtail, which is known for its high - performance and dust - protection capabilities. And our Fiber Optic LC Pigtails are widely used in data centers and telecommunications networks.
Conclusion
Terminating fiber optic ST pigtails is a technical process that requires attention to detail and the right tools. By following the steps outlined in this guide, you can ensure a successful termination and optimal performance of your fiber optic network. If you have any questions about terminating fiber optic ST pigtails or are interested in purchasing our fiber optic products, please don't hesitate to contact us for further discussion and procurement. We look forward to working with you to meet your fiber optic needs.
References
- "Fiber Optic Installation and Maintenance Handbook", Second Edition, by Andrew Huang.
- Manufacturer's documentation for fiber optic tools and connectors.